Setup
There are two ways to use Lore: install the Lore plugin in your coding agent for quick access to sharing and reading threads, or install the CLI for background uploads and advanced workflows like forking. They work independently — you don't need the CLI to use the plugin.
Option 1: Install the Plugin
The Lore plugin works with Claude Code, Codex, and Cowork. Pick the instructions for your agent below.
- Open Customize from the side bar.
- Click +, then choose Create (not Browse).
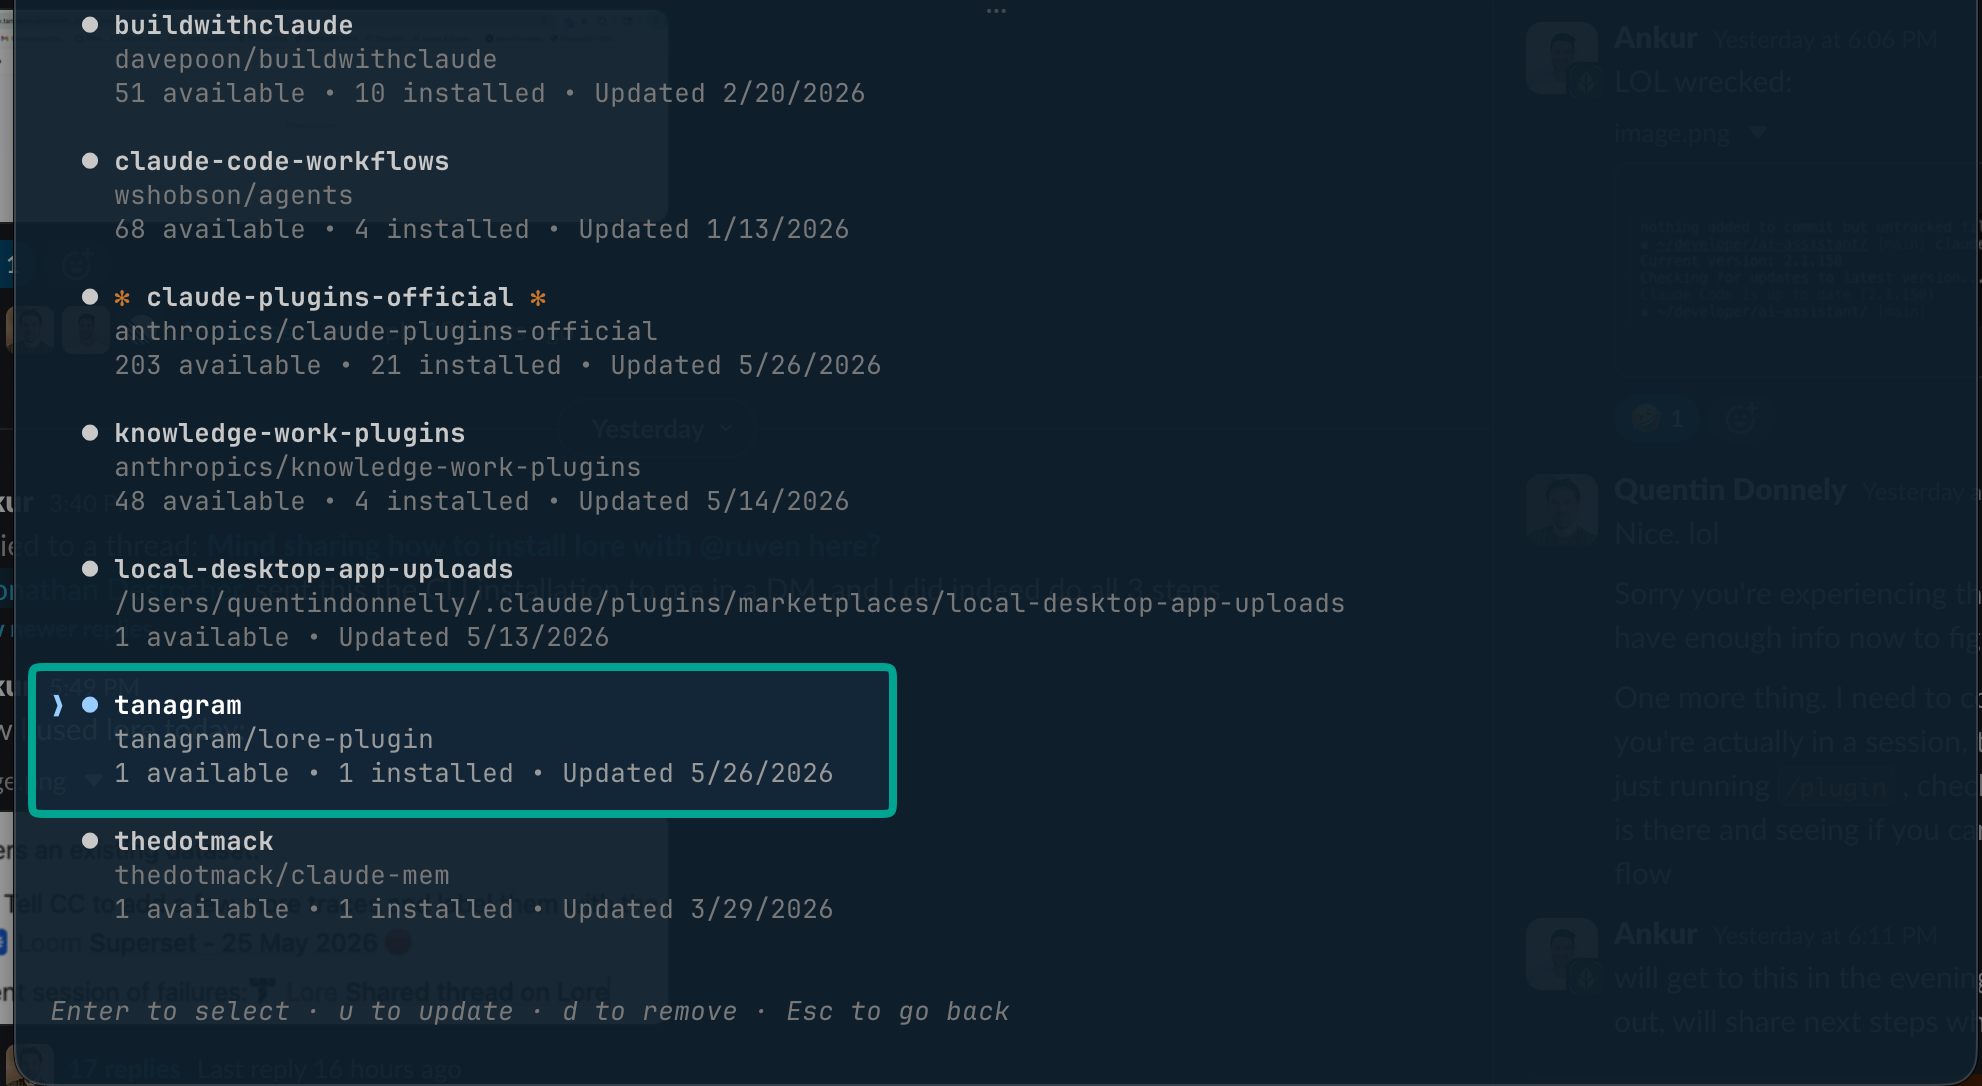
- Click Add marketplace, enter
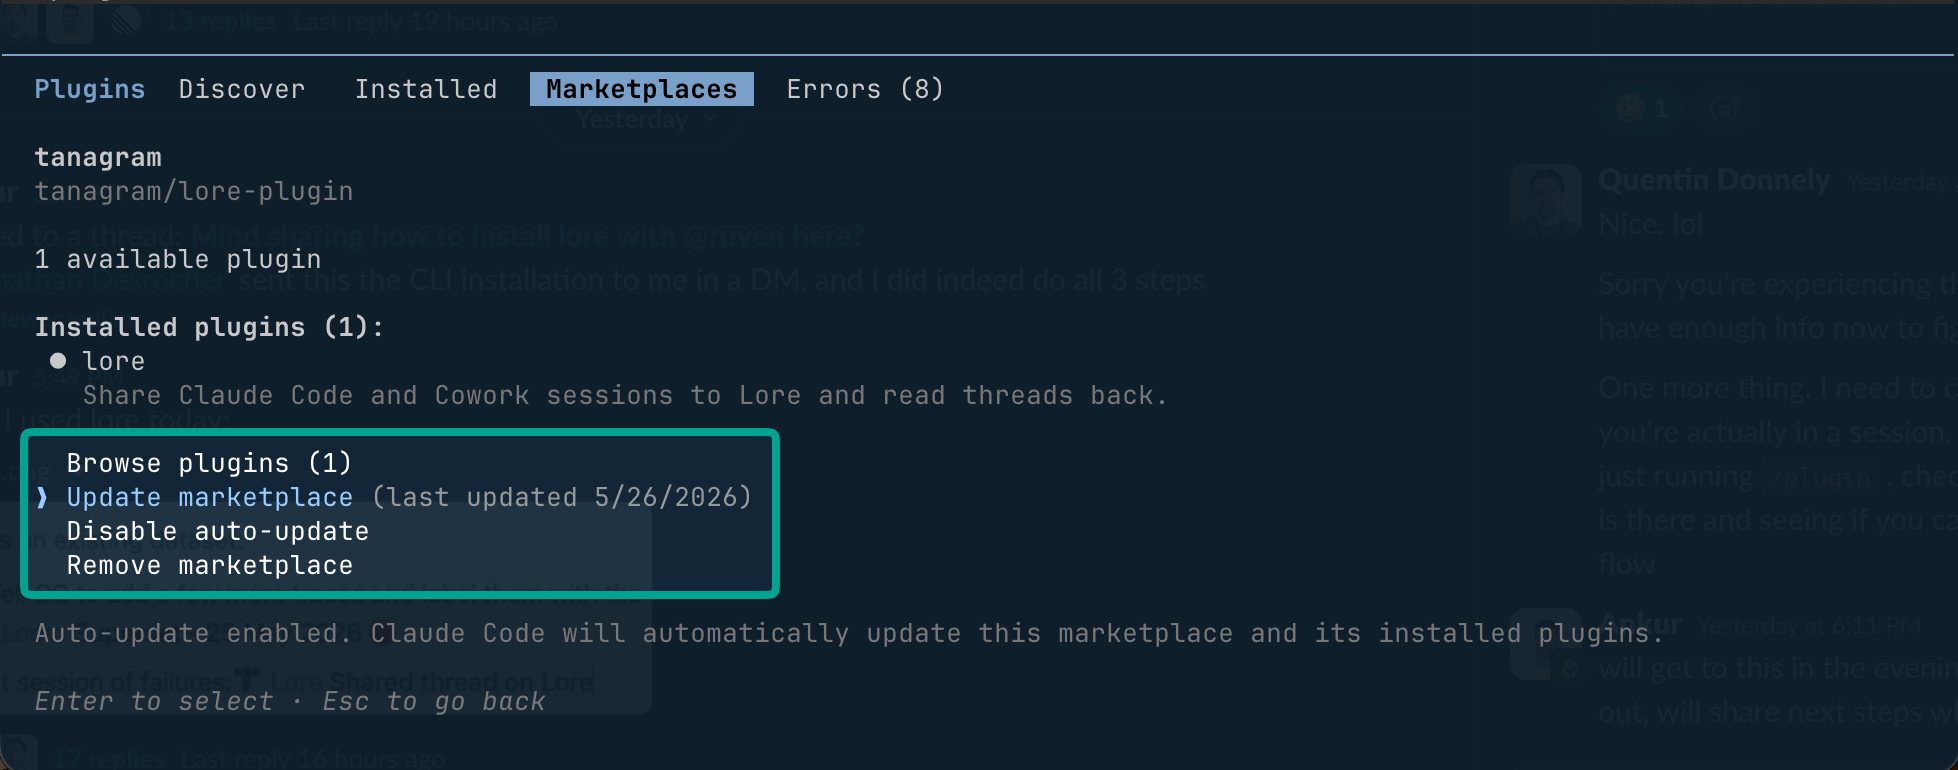
tanagram/lore-plugin, and click Sync.
- Under the Personal tab (next to “Anthropic & partners”), open the Tanagram marketplace and install the Lore plugin.
- Inside a live Claude Code session, run
/plugins to open the interactive plugins TUI.
- Switch to the Marketplaces tab and choose Add Marketplace.
- Enter the marketplace source:
tanagram/lore-plugin.
- Open the new tanagram (or Tanagram) marketplace and install the Lore plugin.
Claude Code — /plugins → Marketplaces → tanagram → install Lore:
Or install from a plain terminal outside a session:
claude plugin marketplace add tanagram/lore-plugin
claude plugin install lore@tanagram
- Inside a live Codex session, run
/plugins to open the interactive plugins TUI.
- Switch to the Marketplaces tab and choose Add Marketplace.
- Enter the marketplace source:
tanagram/lore-plugin.
- Open the new tanagram (or Tanagram) marketplace and install the Lore plugin.
Codex — /plugins → Add Marketplace → Tanagram → install Lore:


Or install from a plain terminal outside a session:
codex plugin marketplace add tanagram/lore-plugin
codex plugin install lore@tanagram
This gives you two plugin slash commands: /lore:share to export sessions, and /lore:read to read and search threads. The plugin connects to Lore's remote server directly — no other dependencies needed.
The first time you use the plugin, it will walk you through authenticating with your Lore account.
Option 2: Install the CLI
The CLI provides additional features: a background daemon that auto-uploads sessions, /fork for continuing work from existing threads, and a scriptable interface to Lore's APIs.
npm install -g @loredotlink/cli
lore login
The login flow prints a verification URL and a short user code — open the URL in your browser, enter the code, and you're authenticated. The CLI also registers skills (/share, /lore-read, /fork) in Claude Code automatically.
Background Uploads (CLI)
The CLI can run a background daemon that automatically uploads sessions from directories you choose:
lore configure                         # interactive directory picker
lore enable                            # start the background daemon
lore status                            # verify it's running
You can also manage watched directories directly:
lore listen create ~/projects/my-app   # start watching a path
lore listen list                       # show all watched paths
lore listen delete ~/projects/my-app   # stop watching a path
The daemon runs as a macOS LaunchAgent and uploads sessions as they are created or updated. Background uploads are optional — you can always share individual sessions on demand with /share.
Sharing Sessions
Sharing a session takes a single command inside your coding agent.
Share with the plugin
Type /lore:share inside any Claude Code, Codex, or Cowork session with the Lore plugin installed. Lore uploads the current session and returns a shareable URL. The URL is automatically copied to your clipboard.
If you installed the CLI instead, use /share in Claude Code/Cowork. You can share the same session multiple times — Lore deduplicates by session ID, so re-sharing is safe and won't create duplicates.
Codex CLI fallback
If you are not using the plugin in Codex, install the CLI (npm install -g @loredotlink/cli) and use /share-codex instead. It works identically — same export, same URL format.
Controlling Visibility
By default, sessions shared via /lore:share or /share are visible to your workspace (anyone with the same email domain). You can ask for a different visibility level when sharing — just say "share this privately" or "share this publicly."
From the CLI, you can also control visibility explicitly:
lore export --visibility private   # only you
lore export --visibility public    # anyone with the URL
See Privacy and Visibility for a full explanation of the three visibility levels.
Background Uploads vs On-Demand Sharing
There are two ways sessions end up in Lore:
- Background daemon (CLI only,
lore enable): automatically uploads sessions from your configured directories as you work. Uploaded sessions start as private and stay that way until you explicitly share them.
/lore:share (plugin) or /share (CLI): exports and shares a specific session right now, setting its visibility to workspace by default.
These complement each other — the daemon ensures your sessions are preserved, and on-demand sharing is for when you want to hand a link to someone immediately.
Reading Threads
Lore threads are searchable and retrievable from inside your coding agent, from the web, or from the command line.
Using the Plugin
If you installed the plugin, type /lore:read inside Claude Code, Codex, or Cowork to fetch or search threads. You can:
- Paste a thread ID (
th_...) or a Lore URL to fetch a specific thread
- Ask for recent threads from your workspace
- Filter by author, file path, or time range
The agent retrieves thread content from Lore and summarizes it inline.
If you have the CLI installed instead, the equivalent skill is /lore-read — it works the same way.
Browsing the Web UI
Visit lore.link to browse your threads visually. The web UI shows thread previews, lets you filter by workspace member, and links directly to shareable URLs.
CLI Commands
The CLI provides commands for fetching and listing threads directly:
lore threads get th_abc123
lore threads get https://lore.link/thread/th_abc123
To list recent threads with optional filters:
lore threads list

# threads touching specific paths
lore threads list --filepath_prefixes src/auth,src/api

# threads from a time range (Unix timestamps)
lore threads list --created_at 1746057600...1746662400

# combine filters (ANDed together)
lore threads list --filepath_prefixes src/auth --created_at 1746057600
Filters AND together server-side. Multiple values within --filepath_prefixes are comma-separated and ORed. Output is JSON when stdout is not a TTY, making it easy to pipe into jq or other tools.
Forking Threads
Forking lets you continue work from an existing thread. Instead of reading the raw transcript, the agent receives a distilled handoff summary tailored to what you're about to do.
This feature requires the CLI (npm install -g @loredotlink/cli). It is not included in the plugin.
Using /fork in Claude Code
/fork <thread-url-or-id> <intent>
For example:
/fork https://lore.link/thread/th_abc123 add rate limiting to the auth endpoint
Lore fetches the thread, generates a context summary shaped around your intent, and loads it into the agent's context. The agent can then continue from where the thread left off.
How It Differs From Reading Threads
/lore:read (plugin) or /lore-read (CLI) fetches thread content for inspection — useful for understanding what happened, reviewing decisions, or referencing prior work./fork (CLI) fetches a distilled summary optimized for continuing work — the intent you provide tells Lore what to emphasize, so you get focused context rather than the full transcript.
Why the Intent Matters
The intent you pass to /fork shapes what gets surfaced. If you're debugging a performance issue versus adding a new feature, the relevant context is different even in the same thread. Being specific about your intent gives you a more useful handoff.
Example Use Cases
- Picking up a coworker's investigation: fork their thread with the intent of resolving the issue they were diagnosing
- Continuing a debugging session: fork your own thread from yesterday to resume where you left off
- Building on a prototype: fork a thread where someone explored an approach, with the intent of turning it into production code
- Reviewing before a PR: fork a thread to understand the decisions behind a change before reviewing the diff
Privacy And Visibility
Lore gives you control over who can see your threads, both at the individual thread level and through upload filters for the CLI's background daemon.
Visibility Levels
Every thread has one of three visibility settings:
private — visible only to you. This is the default for all threads.workspace — visible to anyone on your team (matched by email domain).public — visible to anyone with the URL, including people outside your workspace.
Changing Visibility When Sharing
When you run /lore:share (plugin) or /share (CLI), the thread is shared at workspace visibility by default. You can ask for a different level — just say "share this privately" or "share this publicly."
From the CLI, you can also set visibility explicitly:
lore export --visibility private   # only you
lore export --visibility public    # anyone with the URL
You can update a thread's visibility after the fact from the web UI at lore.link.
Controlling What the Daemon Uploads (CLI)
If you use the CLI's background daemon (lore enable), it respects upload filters defined in ~/.lore/upload_filters.json. This lets you restrict which sessions are automatically collected.
{
  "include": {
    "cwd": ["/Users/alice/projects/work"],
    "repo": ["github.com/myorg/myrepo"]
  },
  "exclude": {
    "cwd": ["/Users/alice/projects/personal"]
  }
}
Filter logic:
cwd and repo are a union — a session is location-allowed if it matches a cwd rule OR a repo rule, so you can allowlist a git repo and a standalone directory at the same time (a non-git directory uploads via its cwd).- When set,
skills further narrows that set (ANDed) — the session must also match a skills rule.
- Within a dimension, multiple values are ORed — matching any one value is sufficient.
exclude rules override includes — a session matching an exclude rule is never uploaded regardless of includes.
If include is empty or omitted, all sessions from your configured directories are uploaded.
Managing Watched Directories (CLI)
Use these commands to control which directories the daemon watches:
lore listen create ~/projects/work   # start watching
lore listen list                     # show all watched paths
lore listen delete ~/projects/work   # stop watching
See Setup for initial configuration.
Workspace Auto-Grouping
Users who sign up with the same email domain are automatically added to the same workspace. There is no manual invitation step — your teammates can sign up independently and they'll see workspace-visibility threads from anyone on the domain.